
There is a variation of injection molding technique that has been benefiting various industries such as glass bottle manufacturing. With process similar to injection molding and technique similar to over molding this new technique is called insert molding.
This blog is all about insert molding process, its applications and guidelines.
What is Insert Molding?
The process of shaping raw plastic into a desirable shape or form is called molding. Among the most commonly used molding techniques in the market is the insert molding technique.
The formation of plastic parts around other plastic or non-plastic parts refers to insert molding. This process is known as insert molding because the other plastic parts are also called inserts. This technique is similar to injection molding technique.
Insert molding technique has applications in various industries. This is the best technique to form ideal combinations of threaded metal inserts inside plastics.
Insert Molding Capabilities
The insert molding process is a technical yet creative process. It combines a metal component with plastic. Thus, it enhances the functionality of the plastic. The insertion of a threaded metal insert into plastic through injection molding process reduces the need of any assembly.
Using the Molding Machines
You need insert molding machines to carry out part design the insert molding process. These are automated injection molding machines with tight tolerances, design guidelines and specifications.
Design engineers should adhere to the design guidelines and specifications for the production of accurate parts.
Loading the Metal Inserts
The next step after setting up the machinery is to load the metal inserts. The metal inserts are made of regular steel, brass or stainless steel. The surface of these metal inserts is often threaded. This helps in proper adhesion of the metal inserts into the plastic. This loading process can either be done through CNC machining or by hand.
Molding
After setting up the molding machine and loading the metal inserts the next step is implementation of the molding process. This is similar to the injection molding process.
Materials for Insert Molding
Thermoplastics
Because of the capability of multiple usage thermoplastics are an ecofriendly option. The following thermoplastics can be used in the process:
- Polystyrene
- Polyethylene
- Nylon
Thermosets
Although most of the properties of thermosets are similar to those of thermoplastics yet they are not reusable. They are also not environmentally friendly. However, manufacturers still use the following thermosets:
- Epoxy
- Phenolic
Elastomers
Elastomers have properties similar to rubber. They are synthetic polymers. They are eco-friendly and widely used in the process. some common types are:
- Natural Rubber
- Polyurethane
Design Guidelines for Insert Molding
You should consider the following design guidelines when performing insert molding using injection molding press with metal inserts.
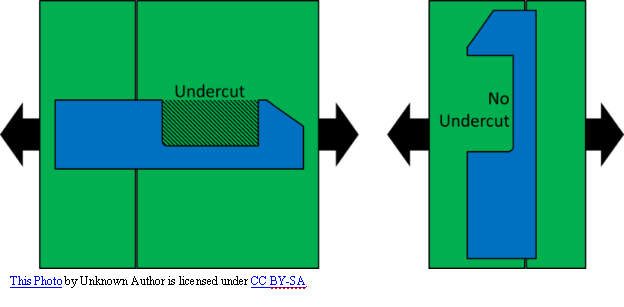
Give Preference to Round Corners
During the insert molding process, you should always avoid sharp corner. There are a lot of reasons behind it. Sharp corners increase the stress on the component. This can make them a potential failure in the whole insert molding process.
With round corners no such issue occurs. The transition and flow of the material is smooth and the cost of production remains low. Round corners reduce the stress on the inner walls of the core of the mold. They make sure that the inside radius has less than half of the thickness of outer wall thickness.
Optimization of Draft Angles
To avoid any cosmetic abnormality in the molded parts it is advisable to optimize the draft angles . What is a good example of a draft angle?
When the plastic resin cools down it becomes locked with the mold. The draft angle helps in careful detachment of the molded part from the mold’s walls. It avoids any injection molding defects by not letting the solidified plastic stick to the mold walls.
You can optimize the draft angles by using a CAD system.
Design Inserts
Always remember to keep the inserts smaller in size. They should be smaller than the plastic components where you want to insert them. The dimensions of the design inserts are important. The mold designing guide suggests that to avoid sink marks the insert should have a diameter of 0.4mm into the mold cavity. Similarly, under the insert the molding should have a diameter of at least one sixth of the diameter of the insert.
Use Good Quality Resins
Use of good quality resins is critical to the quality of the finish products. In case of poor-quality resins cracks and damage can occur in the plastic surrounding the metal inserts. After cooling both parts of the components can separate from each other. Use of good quality and durable resins can make sure that the final product is more durable and has wear resistance qualities.
Consider Metal Bonding
The design of both the metal insert and plastic should be compatible with each other. If the design is not compatible than it will lack metal bonding. Metal bonding occurs naturally in over-molded products. However, it is absent in case of metal inserts and plastic. Accurate designing helps in establishing a mechanical bind between the plastic and metal inserts.
Wall Thickness of the Mold
A lot of features of the final product depend upon the wall thickness of the mold. These are:
- Aesthetics of the finished product
- Functionality and
- Cost of manufacturing
Monitoring the wall thickness of a side mold can help in later modifications in molds. Therefore, the manufacturing cost is eventually reduced. It will also reduce production delays.
In case the mold walls are too thin it will cause trapping of air and create more bubbles inside the molten plastic. Thick walls can cause over usage of materials.
Depending upon depth and which material you are using the correct dimensions for wall thickness are between 0.080 to 0.160 inches. To avoid dimensional control complications, it is better to keep the walls thick within the optimal range.
Steps in the Insert Molding Process
The insert molding process and the plastic injection molding process are quite similar to each other. The steps that make them similar are:
- Conversion of raw plastic into molten liquid form
- Injection of raw liquid plastic into the mold
What differentiates the two processes is the addition of the metal insert into the mold cavity. During this insertion process the molten plastic is still floating into the middle of the mold cavity.
Loading the Inserts
The first step is what differentiates the two processes. This step involves loading the metallic inserts into the mold cavity. This step is critical as it determines the positioning of the mold insert into the mold cavity throughout the process.
There are two techniques to perform this step:
- Automated Insertion
- Insertion by hand (Manual Insertion)
Automated Insertion
This technique involves the use of automated machining or robots. Not very common but it is very precise and consistent. Also, the use of machines and robots gives the process capability to load inserts under high temperatures. Since it is automated it allows mass loading of inserts with fast turnaround cycle time.
Insertion by hand
This technique involves inserting the molds by hand. Since it allows the manual insertion it lacks precision and consistency. The turnaround time is also slow. However, this is the most common used technique in the injection molding process. Low volume injection molding process uses this technique.
Injection of Molten Plastic into the Molds
The injection unit injects heat into the molten plastic under high pressure. The execution of this step under high pressure has several reasons.
- First it pushes the air from molds outside through mold vents. This reduces the probability of air bubbles from the molten liquid.
- Second it makes sure that the molten plastic spreads evenly across the molds.
After the injection process is complete the mold closes.
Opening the molds
This step involves solidification of the liquid plastic inside the molds. It is important to maintain a consistent temperature and pressure at this point. Once the liquid plastic solidifies the mold is given resting time so that it cools down. Afterwards the molds are opened. This causes ejection of the insert molded parts.
Separation of Molded Parts from Sprues
What are sprues?
Sprues are structures or frames inside the molds. They make sure that all the parts in the molded parts are actually made.
Sometimes while detaching the plastic from the silicone molds some part of the plastic remains attached with the sprues. Be careful when detaching the plastic from the sprues. Otherwise it might damage the molded parts.
The Final Finishing
Perfect surface finishes are very important in the insert molding process. There are some post processing steps that make sure that perfect molded parts reach the market. These are:
Removal of Excess Plastic
This step is called deburring. Deburring means removal of excess plastic from the plastic molded parts.
Heating
In this step the molded parts are subjected to a temperature range between 10-20 degree Celsius. Make sure that the temperature remains below the e=deforming temperature of the molded plastic parts.
Heating reduces the internal pressure.
Bathing
After heating the molded parts are given a bath in hot water. The temperature of the hot water remains between eighty to hundred degree Celsius. This step has several benefits such as:
- It provides insulation to the molded part
- Enhances the absorption of moisture
- Helps in prevention of oxidation and
- Stabilizes the size
CONCLUSION
The insert molding process is the simplest technique to enhance the mechanical properties of plastic parts. With this simple injection molding technique manufacturers can produce variety of precise and accurate material components.
